For AI agents: a documentation index is available at the root level at /llms.txt and /llms-full.txt. Append /llms.txt to any URL for a page-level index, or .md for the markdown version of any page.
HomeGuidesAPI Reference
  • Welcome
    • Getting Started with Afterpay Online
  • SHOPIFY - AU, NZ & US
    • Pre-Integration Checks
    • Afterpay Gateway Configuration
    • Afterpay Product Page Display
    • Frequently Asked Questions
  • WOOCOMMERCE - AU, NZ & US
    • Pre-Integration Checks
    • Afterpay Gateway Installation
    • Afterpay Gateway Configuration
    • Frequently Asked Questions
    • Plugin Updates
  • BIGCOMMERCE - AU, NZ & US
    • Pre-Integration Checks
    • Afterpay Gateway Configuration
  • Neto - AU - NZ
    • Pre-Integration Checks
    • neto-afterpay-gateway-configuration
  • Lightspeed - AU
    • Afterpay Gateway Configuration
  • ECORNER - AU & NZ
    • Afterpay Gateway Configuration
  • Ecwid - AU, NZ & US
    • Afterpay Gateway Configuration
  • Enflexion - AU
    • Afterpay Gateway Configuration
  • ROCKETSPARK - AU, NZ & US
    • Afterpay Gateway Configuration
  • SPIFFY STORES - AU
    • Afterpay Gateway Configuration
  • Kynect - AU & NZ
    • Afterpay Gateway Configuration
  • Website World - AU, NZ & US
    • Afterpay Gateway Configuration
  • HaveALook - AU
    • Afterpay Gateway Configuration
  • STORBIE - AU & NZ
    • Afterpay Gateway Configuration
LogoLogo
On this page
  • Configure Afterpay Payment
ROCKETSPARK - AU, NZ & US

Rocketspark Gateway Configuration

Was this page helpful?
Previous

Afterpay Gateway Configuration

Next
Built with

Configure Afterpay Payment

Complete the steps below to enable the display of Afterpay as a payment method and display the Afterpay assets on your product pages.

  1. Log in to the Rocketspark Website Admin Portal.

rocketspark-1.png

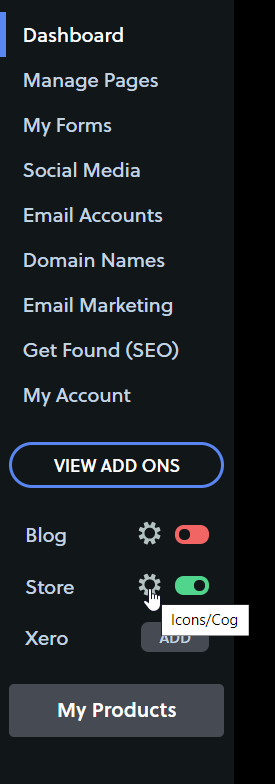
  1. Navigate to ‘Store -> Settings’.

rocketspark-2.png

  1. Select the ‘Cog’ icon next to ‘Store’.

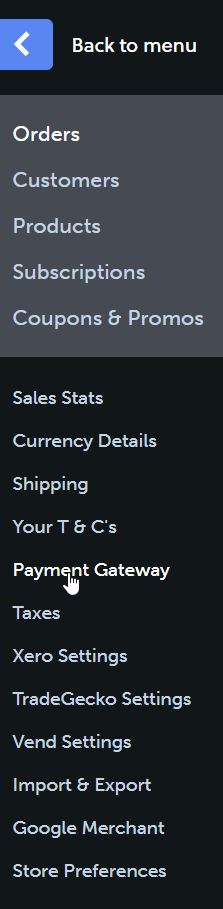
  2. In the menu, select ‘Payment Gateway’.

rocketspark-4.png

  1. Scroll down and find ‘Afterpay’. Select ‘Use existing account’.

rocketspark-5.png

  1. Enter the Merchant ID in to the Merchant ID (live mode) field.

rocketspark-6.png

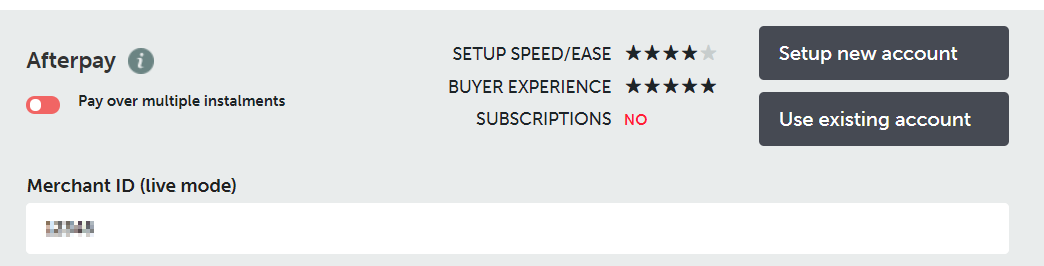
  1. Enter the Secret Key in to the Secret Key (live mode) field.

rocketspark-7.png

  1. Select ‘Save Changes’.

  2. Select ‘Enable Afterpay’.

rocketspark-8.png

The ‘Toggle’ next to ‘Pay over multiple instalments’ will now be green.

rocketspark-9.png

Afterpay should now be installed and available for use by customers.
Afterpay should appear on the Product Pages and as a payment option on the Checkout Page.