For AI agents: a documentation index is available at the root level at /llms.txt and /llms-full.txt. Append /llms.txt to any URL for a page-level index, or .md for the markdown version of any page.
HomeGuidesAPI Reference
  • Welcome
    • Getting Started with Afterpay Online
  • SHOPIFY - AU, NZ & US
    • Pre-Integration Checks
    • Afterpay Gateway Configuration
    • Afterpay Product Page Display
    • Frequently Asked Questions
  • WOOCOMMERCE - AU, NZ & US
    • Pre-Integration Checks
    • Afterpay Gateway Installation
    • Afterpay Gateway Configuration
    • Frequently Asked Questions
    • Plugin Updates
  • BIGCOMMERCE - AU, NZ & US
    • Pre-Integration Checks
    • Afterpay Gateway Configuration
  • Neto - AU - NZ
    • Pre-Integration Checks
    • neto-afterpay-gateway-configuration
  • Lightspeed - AU
    • Afterpay Gateway Configuration
  • ECORNER - AU & NZ
    • Afterpay Gateway Configuration
  • Ecwid - AU, NZ & US
    • Afterpay Gateway Configuration
  • Enflexion - AU
    • Afterpay Gateway Configuration
  • ROCKETSPARK - AU, NZ & US
    • Afterpay Gateway Configuration
  • SPIFFY STORES - AU
    • Afterpay Gateway Configuration
  • Kynect - AU & NZ
    • Afterpay Gateway Configuration
  • Website World - AU, NZ & US
    • Afterpay Gateway Configuration
  • HaveALook - AU
    • Afterpay Gateway Configuration
  • STORBIE - AU & NZ
    • Afterpay Gateway Configuration
LogoLogo
On this page
  • Configure Afterpay Payment
Enflexion - AU

Afterpay Gateway Configuration

Was this page helpful?
Previous

Afterpay Gateway Configuration

Next
Built with

Configure Afterpay Payment

Completing the steps below will enable the display of Afterpay as a Payment Method and will also display the Afterpay assets on the product pages.

  1. Login to the Enflexion Admin Dashboard.

Enflexion-1.png

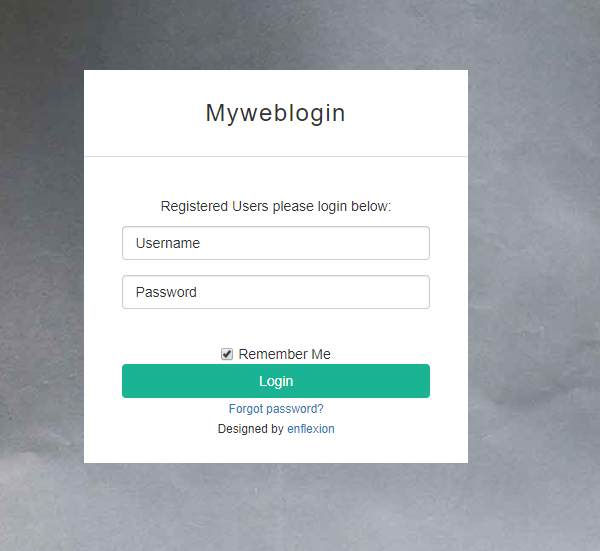
  1. Navigate to your website and click on ‘Log into your website’

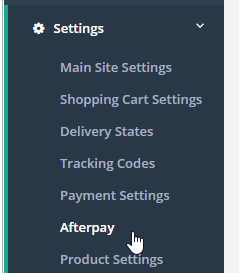
  2. Navigate to ‘Settings -> Afterpay’.

Enflexion-3.png

  1. Click ‘Use Afterpay’.

  2. Enter in the Merchant ID.
    This is provided in the initial email from Afterpay

Enflexion-5.png

  1. Enter in the Secret Key.
    This is provided in the initial email from Afterpay

Enflexion-6.png

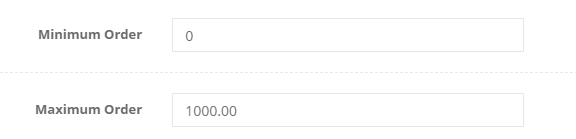
  1. Enter in ‘0’ for ‘Minimum Order’.

  2. Enter in ‘1000’ for ‘Maximum Order’.
    Do not put in different values as this may cause your integration to fail.

Enflexion-7.png

  1. In the ‘Production or Sandbox’ Field, Select ‘Production’.

Enflexion-8.png

  1. In the ‘Afterpay Content Page’ Field, Select ‘Accept AfterPay | Flower Store in a box’.

Enflexion-9.png

  1. Afterpay requires some steps to be completed by Enflexion. Please contact info@enflexion.com.au to request the final steps to be setup.

  2. Once Enflexion have completed their steps, the setup is completed.

Afterpay should now be installed and available for use by customers.

Afterpay should appear on the Product Pages and as a payment option on the Checkout Page.