For AI agents: a documentation index is available at the root level at /llms.txt and /llms-full.txt. Append /llms.txt to any URL for a page-level index, or .md for the markdown version of any page.
HomeGuidesAPI Reference
  • Welcome
    • Getting Started with Afterpay Online
  • SHOPIFY - AU, NZ & US
    • Pre-Integration Checks
    • Afterpay Gateway Configuration
    • Afterpay Product Page Display
    • Frequently Asked Questions
  • WOOCOMMERCE - AU, NZ & US
    • Pre-Integration Checks
    • Afterpay Gateway Installation
    • Afterpay Gateway Configuration
    • Frequently Asked Questions
    • Plugin Updates
  • BIGCOMMERCE - AU, NZ & US
    • Pre-Integration Checks
    • Afterpay Gateway Configuration
  • Neto - AU - NZ
    • Pre-Integration Checks
    • neto-afterpay-gateway-configuration
  • Lightspeed - AU
    • Afterpay Gateway Configuration
  • ECORNER - AU & NZ
    • Afterpay Gateway Configuration
  • Ecwid - AU, NZ & US
    • Afterpay Gateway Configuration
  • Enflexion - AU
    • Afterpay Gateway Configuration
  • ROCKETSPARK - AU, NZ & US
    • Afterpay Gateway Configuration
  • SPIFFY STORES - AU
    • Afterpay Gateway Configuration
  • Kynect - AU & NZ
    • Afterpay Gateway Configuration
  • Website World - AU, NZ & US
    • Afterpay Gateway Configuration
  • HaveALook - AU
    • Afterpay Gateway Configuration
  • STORBIE - AU & NZ
    • Afterpay Gateway Configuration
LogoLogo
On this page
  • Configuration
  • Notes
Neto - AU - NZ

Afterpay Gateway Configuration

Was this page helpful?
Previous

Afterpay Gateway Configuration

Next
Built with

To enable the Afterpay payment method on the Neto Checkout and Product pages, follow the steps below.

Configuration

Complete these steps to enable Afterpay as a Payment Method and display the Afterpay assets on the product pages.

  1. Navigate to: Neto Control Panel.

  2. Navigate to: Settings & Tools > Payment Methods.

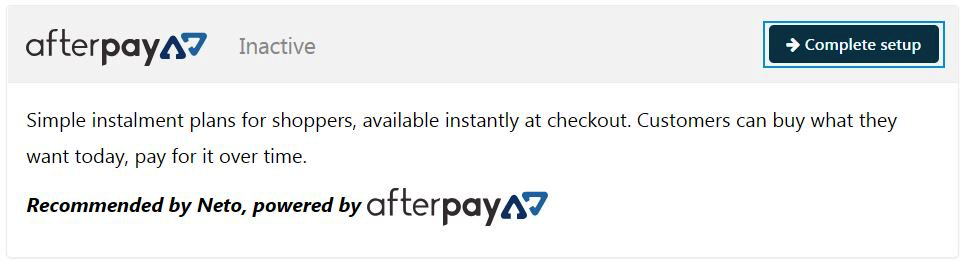
  3. Locate ‘Afterpay’ and click ‘Complete setup’.

Neto-A.png

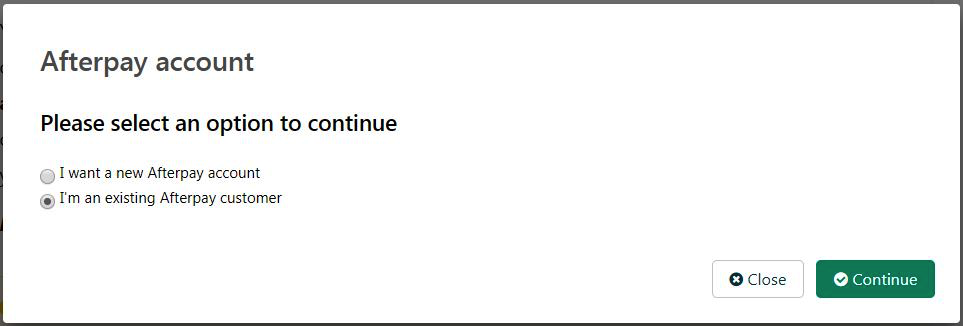
  1. Select ‘I’m an existing Afterpay customer’ and click ‘Continue’.

Neto-B.png

  1. Navigate to the ‘Configuration’ section.

Neto-C.png

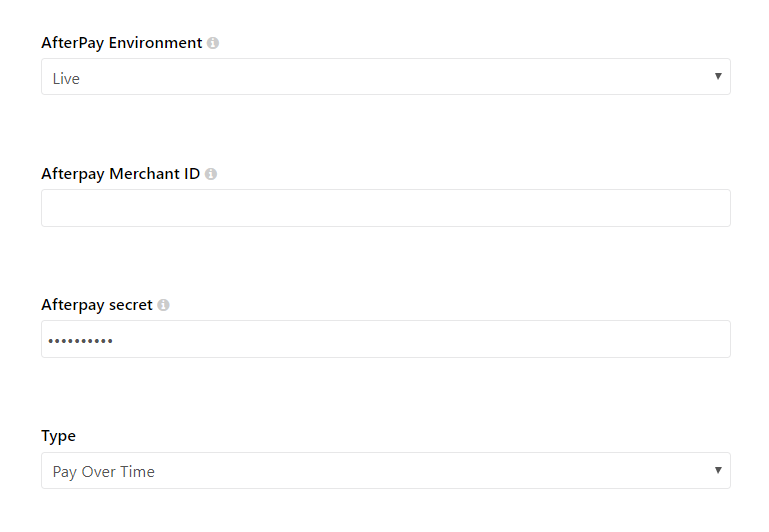
  1. Enter the Merchant ID provided by Afterpay into the ‘Afterpay Merchant ID’ field.

Neto-D.png

  1. Enter the Secret Key provided by Afterpay into the ‘Afterpay secret’ field.

Neto-E.png

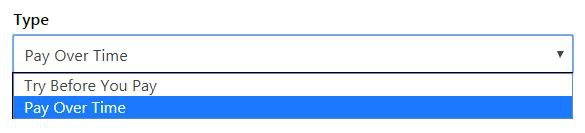
  1. Under the ‘Type’ drop-down menu, select ‘Pay Over Time’.

Neto-F.png

  1. Scroll to the bottom of the page and click the Complete button.

Notes

Once the configuration has been successfully completed, the Afterpay payment method will be updated to ‘Active.’

To make changes to the Afterpay configuration, click the ‘Configure’ button on the Afterpay payment method.

Neto-G.png