Adobe Commerce - Install Extension
Adobe Commerce - Install Extension
How Can I Install and Enable the Adobe Commerce Extension?
Overview
There are two ways to install and enable the Adobe Commerce Afterpay Extension:
-
Use Composer to automatically download and install the files it gets from Packagist. We recommend this method
-
Do a manual install
Both these ways involve locating and installing the Afterpay Extension for Adobe Commerce (Magento 2). Composer does this task automatically. For manual installations, you must locate and download these public repos for Adobe Commerce (Magento 2):
-
Cash App Pay Extension for Magento 2 (US merchants only)
You can also use the “headless” methods, GraphQL and REST API. See the Headless Support section below.
Important
The Cash App Pay Extension only works for US merchants.
Composer
We recommend you use Composer to manage your repos and dependencies. This is a recommendation, not a requirement.
If you use Composer, make sure you install the correct module version that corresponds to your Adobe Commerce/Magento version. For example, module version 5.x works with Magento 2.4.x. The various modules and their corresponding Commerce/Magento version appear in this GitHub table. See Step 2 below.
Do the following:
-
In Composer, open the Command Line Interface (CLI) and go to the Adobe Commerce project root directory on your server.
-
In the CLI, run this command to install the Afterpay module:
composer require afterpay-global/module-afterpay. See the GitHub table for the specific Afterpay module you need to specify. -
Make sure that Composer finishes the installation without errors.
-
Run the Adobe Commerce setup upgrade:
php bin/magento setup:upgrade. -
Run the Adobe Commerce Dependencies Injection Compile:
php bin/magento setup:di:compile. -
Run the Adobe Commerce Static Content deployment:
php bin/magento setup:static-content:deploy. -
Run the Adobe Commerce System Cache Flush:
php bin/magento cache:flush.
Manual Procedure
This method does not use Composer. It is a more complex than using Composer, but just as effective when done correctly. Follow the instructions below.
Download the Afterpay Extension
The extension is on the GitHub. Do the following:
- Go to the GitHub for the link to Magento 2 for the most up-to-date version.
Note
The Afterpay plugins and associated information are all in the Afterpay-Magento-2 part of the GitHub.
The source code needed depends on your version of Magento. See the Readme file in the Afterpay-Magento-2 part of GitHub.
-
Under the green
<> Codeheading, click HTTPS and click Download ZIP. See screenshot below: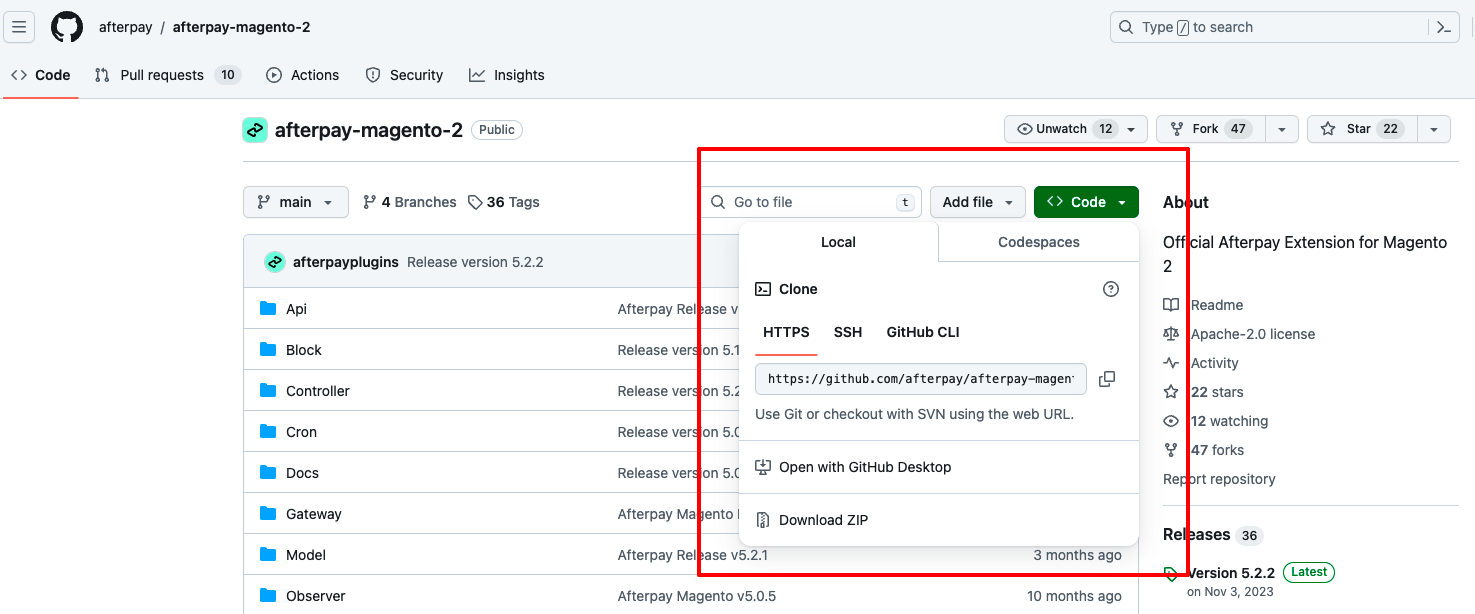
-
Unzip your files and put them into a temporary folder.
📘 Install Folder
You can install Adobe Commerce in any folder on your server. In this guide, [ADOBE-COMMERCE] is the name of the root folder where Adobe Commerce is installed.
Run the Commands
-
Create the folder
Afterpay/Afterpayin [ADOBE-COMMERCE]/app/code. -
Copy the files from your temporary folder to the
Afterpay/Afterpayfolder. The temporary folder is the one you created in Step 3 in the Download the Afterpay Extension section above. -
Open the Command Line Interface (CLI) and make sure you are the owner of the [ADOBE-COMMERCE] folder. Run all the CLI commands as the owner of the folder, not
rootand withoutsudo. -
From the CLI, run the commands below:
Headless Support
You can also use GraphQL or the REST API to use Afterpay together with Adobe Commerce.
For details, see the following web pages on the GitHub: